복습
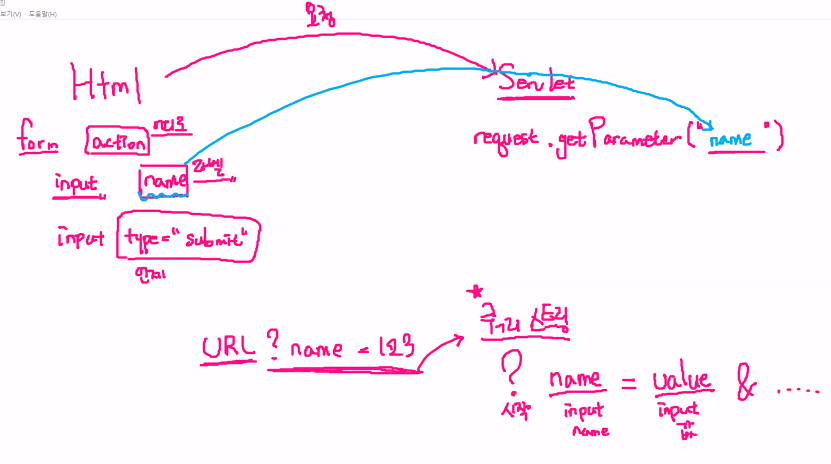
action : 어디로 보낼지 (받아낼 서블릿의 주소)
name : 데이터를 구분할 수 있도록 라벨링
submit : 언제 보낼지
Html 이 요청을 보낼때
URL ? name = 123
↘Query String
request.getParameter("name") -> input태그의 name과 대소문자까지 동일
예제
ex09makemul.java (Servlet)
package ex0509;
import java.io.IOException;
import java.io.PrintWriter;
import javax.servlet.ServletException;
import javax.servlet.annotation.WebServlet;
import javax.servlet.http.HttpServlet;
import javax.servlet.http.HttpServletRequest;
import javax.servlet.http.HttpServletResponse;
/**
*/
@WebServlet("/ex09makemul")
public class ex09makemul extends HttpServlet {
private static final long serialVersionUID = 1L;
protected void service(HttpServletRequest request, HttpServletResponse response) throws ServletException, IOException {
// 색깔, 몇단부터, 몇단까지 --> 수집
String color = request.getParameter("color");
String start = request.getParameter("start");
String end = request.getParameter("end");
int s = Integer.parseInt(start);
int e = Integer.parseInt(end);
// table응답( 배경색이 입력받은 색으로 )
response.setContentType("text/html; charset=utf-8");
PrintWriter out = response.getWriter();
out.print("<html>");
out.print("<head></head>");
out.print("<body>");
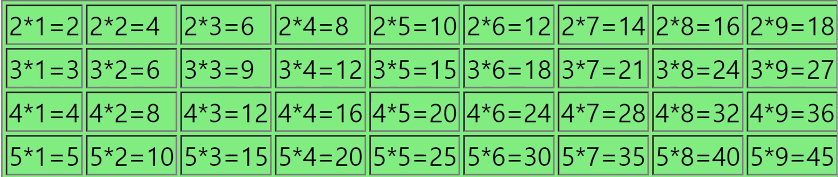
out.print("<table bgcolor='"+color+"' border='1'>");
for (int i = s; i <=e; i++) {
out.print("<tr>");
for (int j = 1; j <=9; j++) {
out.print("<td>"+i+"*"+j+"="+j*i+"</td>");
}
out.print("</tr>");
}
out.print("</table>");
out.print("</body>");
out.print("</html>");
}
}ex09makemul.html
<!DOCTYPE html>
<html>
<head>
<meta charset="UTF-8">
<title>Insert title here</title>
</head>
<body>

    <form action="ex09makemul">
         <input type = "color" name = "color"><br>
         <input type = "number" name = "start"> 단 부터
         <input type = "number" name = "end"> 단 까지
         <input type="submit" value="전송">
    </form>

</body>
</html>
http://localhost:8081/Servlet/ex09makemul?color=%23cc1919&start=2&end=5 에서
?color=%23cc1919&start=2&end=5 -> 쿼리스트링
color의 value값 start의 value값 end의 value값이 다 나와버린다
또한 쿼리스트링에 추가해서 값을 넣을 수 있다.
데이터 전송방식
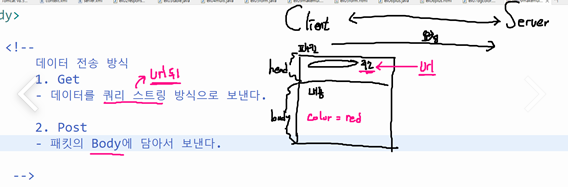
1. Get
- 데이터를 쿼리 스트링 방식으로 보낸다.
- 패킷의 header영역에 데이터를 담음
- 보안이 약함
- url 최대 길이만큼만 전송가능
- 데이터 꺼내는 속도가 조금 더 빠름
2. Post
- 패킷의 Body에 담아서 보낸다.
- 상대적으로 보안이 강함
- 용량제한이 없음
form태그의 method속성을 이용해서 선택 (get / post)
기본값은 get
만들었던 웹페이지에 입력한 값들을 다시 출력해보자
<!DOCTYPE html>
<html lang="en">
<head>
    <meta charset="UTF-8">
    <meta http-equiv="X-UA-Compatible" content="IE=edge">
    <meta name="viewport" content="width=device-width, initial-scale=1.0">
    <title>Document</title>
</head>
<body>
    <form action="ex10join" method="post">
        <table width="400px">
<tr bgcolor="gray" height="50px" align="left">
    <th colspan="2">STEP1 : 아이디/비번 입력</th>
</tr>
<tr bgcolor="whitesmoke" height="35px">
    <td align="right">아이디</td>
    <td><input type="text" name="id"></td>
</tr>
<tr bgcolor="whitesmoke" height="35px">
    <td align="right">비밀번호</td>
    <td><input type="password" name="pw"></td>
</tr>
<tr bgcolor="whitesmoke" height="35px">
    <td align="right">비밀번호 확인</td>
    <td><input type="password" name="pwc"></td>
</tr>
<tr bgcolor="gray" height="50px" align="left">
<th colspan="2">Step2 : 개인정보</th>

</tr>
<tr bgcolor="whitesmoke" height="35px">
    <td align="right">성별</td>
<td>남<input type="radio" name="gender" value="man">
    여<input type="radio" name="gender" value="woman"></td>
</tr>
<tr bgcolor="whitesmoke" height="35px">
<td align="right">혈액형</td>
<td><select name="abo">
    <option value="A">A형</option>
    <option value="B">B형</option>
    <option value="AB">AB형</option>
    <option value="O">O형</option>
</select></td>
</tr>
<tr bgcolor="whitesmoke" height="35px">
    <td align="right">생일</td>
    <td><input type="date" name="date"></td>
</tr>

</tr>
<tr bgcolor="gray" height="50px" align="left">
<th colspan="2">Step3 : 선호도</th>
</tr>
<tr bgcolor="whitesmoke" height="35px">
<td align="right">취미</td>
<td>
    축구<input type="checkbox" name="hobby" value="soccer">
    야구<input type="checkbox" name="hobby" value="baseball">
    농구<input type="checkbox" name="hobby" value="basketball">
</td>
</tr>
<tr bgcolor="whitesmoke" height="35px">
    <td align="right">좋아하는색깔</td>
    <td><input type="color" name="color"></td>
</tr>
<tr bgcolor="gray" height="50px" align="left">
<th colspan="2">Step4 : 적고 싶은 말</td>
</tr>
<tr bgcolor="whitesmoke" height="35px">
    <td colspan="2">
        <textarea name="talk" cols="56" rows="5"></textarea>
    </td>
</tr>
<tr bgcolor="whitesmoke" height="35px">
<td align="center" colspan="2"><input type="submit">
<input type="reset"></td>
</tr>
            </table>

    </form>
</body>
</html>
package ex0509;
import java.io.IOException;
import java.io.PrintWriter;
import javax.servlet.ServletException;
import javax.servlet.annotation.WebServlet;
import javax.servlet.http.HttpServlet;
import javax.servlet.http.HttpServletRequest;
import javax.servlet.http.HttpServletResponse;
@WebServlet("/ex10join")
public class ex10join extends HttpServlet {
private static final long serialVersionUID = 1L;
protected void service(HttpServletRequest request, HttpServletResponse response) throws ServletException, IOException {
//0. 인코딩
// Get방식의 경우
// Servers 프로젝트 > server.xml파일에서 수정해줘야한다.
// Connector태그의 URIEncoding 속성을 주면된다.
// Post방식의 경우
// 패킷의 내용에 들어있기 때문에 request객체에 인코딩 방식 지정을 해줘야한다.
// request.setCharacterEncoding("인코딩 방법");
request.setCharacterEncoding("UTF-8");
// 1. 파라미터 수집
String id = request.getParameter("id");
String pw = request.getParameter("pw");
String pwc = request.getParameter("pwc");
String gender = request.getParameter("gender");
String abo = request.getParameter("abo");
String date = request.getParameter("date");
String[] hobbys = request.getParameterValues("hobby");
// 같은 name의 input태그값 전부 가져오기
// request.getParameterValues("Name");
// 배열 > String으로 변환
String hobby = Arrays.toString(hobbys);
String color = request.getParameter("color");
String talk = request.getParameter("talk");
// 2. 응답
// 응답 형식 지정
response.setContentType("text/html; charset=utf-8");
//PrintWriter 생성
PrintWriter out = response.getWriter();
// 응답 내용 작성
out.print("<html>");
out.print("<head></head>");
out.print("<body>");
out.print("ID : "+id+"<br>");
out.print("PW : "+pw+"<br>");
out.print("PWC: "+pwc+"<br>");
out.print("GENDER : "+gender+"<br>");
out.print("ABO : "+abo+"<br>");
out.print("DATE : "+date+"<br>");
out.print("HOBBY : "+hobby+"<br>");
out.print("COLOR : "+color+"<br>");
out.print("TALK : "+talk+"<br>");
out.print("</body>");
out.print("</html>");
}
}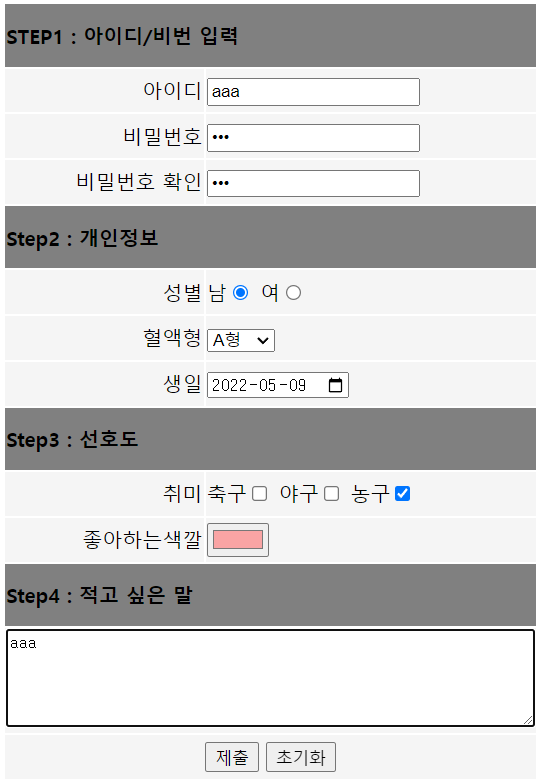

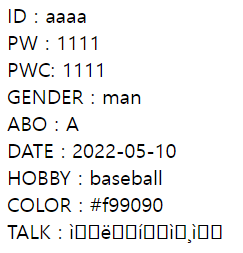
취미는 여러개를 체크할 수 있는 체크박스였고
2개~를 체크했는데 하나밖에 나오지 않고,
talk에 썼던 한글이 깨져서 나온다

server.xml에서
Connector에
URIEncoding=""설정
해주면 Get방식 인코딩은 끝난다.
하지만 Post방식은 패킷의 내용에 들어있기 때문에 request객체에 인코딩 방식 지정을 해줘야한다.
request.setCharacterEncoding("UTF-8");
체크박스 같이 같은 Name을 가진 여러 값을 가져오려면
request.getParameterValues("Name"); 을 통해 가져온다
-> request.getParameterValues("hobby");
한개의 값을 가져 올때는 String 형태로 가져왔지만 여러개 값을 받아올 때는 String[] 배열로 받아와야 한다.
-> String[] hobby = request.getParameterValues("hobby");

하지만 String[] hobby = request.getParameterValues("hobby");로 쓰면 옆과 같이 배열의 주소값이 나온다.
그래서 배열을 문자열로 변환해줘야한다.
배열 > String으로 변환 String hobby = Arrays.toString(hobbys);
↓

'빅데이터 서비스 교육 > JSP Servlet' 카테고리의 다른 글
| JSP 지시자, 내장객체 (0) | 2022.05.10 |
|---|---|
| JSP 개념, 구성요소 (0) | 2022.05.10 |
| JSP/Servlet 데이터 전송 (0) | 2022.05.03 |
| JSP/ Servlet 웹 동작 방식 (0) | 2022.05.02 |
| JSP/Servlet 기초 (0) | 2022.05.02 |